Showing posts with label Pinaddicts Challenge. Show all posts

Saturday, 1 December 2012

PinAddicts Challenge - December 2012..... Christmas Stockings!

It's that time of the month again for the PinAddicts Challenge and my entry also happens to be the unveiling of my secret project for Tiny Angel and Ballet Mums.

It started with an obsession with Christmas Stockings!   They just HAVE to be the right shape!

I started looking around (but have only recently pinned onto Pinterest).

....and a huge dose of inspiration from my Christmas Board on Pinterest!  As you can see from my board I have been collecting them!  Not all that I have seen but the select few that are the right shape!  I have yet to pin one from Louise at Sew Scrumptious...adore those....hang on!  OK, I've pinned them now!

I have been looking at tutorials. I felt the Best One was from .... *drum roll please*...... Fabric Worm!  Is simple, easy to follow and the result is beautiful.

So starting with my fabric from the post previous to this one.......

 
...and some of the wadding left over from this post.........


....and a huge dose of inspiration from my Christmas Board on Pinterest! And the tutorial from Fabric Worm....I started to cut......
 
2 outer fabrics, 2 waddings & 2 linings for the foot part and 1 cuff fabric and 1 cuff wadding for the...cuff!
 
 
I shan't go into the making part because the tutorial is so good, I don't think it is necessary for me to add anything else!
 
So straight onto the reveal then...........
 
OK.....TAAAA-DDAAAHHHHH!!!.............
 
Girlie Stocking for Ballet Mum No.1.......
 
 
Boy Stocking for Ballet Mum No.2...........

 
(sorry about the fuzzy pic on that one!)
 
Big Boy stocking for Ballet Mum No.1..................


And finally my very first creation.... Girlie Stocking for Tiny Angel.......

 
How utterly bonkers proud am I of these!!!?
 
I can't tell you....but the best feeling is that other people LOVE them too, they bring happy-ness and smile-y-ness and make me happy and smile-y in return.
 
With the wadding they feel gorgeously luxurious and I adore the fabrics....I have more to make and as yet no two will be the same!  That's what I call a Hand Crafted Original!
 
And let's be honest....who wouldn't want one of those!
 
I have a plan to personalise them....but that will have to wait 'til next year.  It's novel (I think) and can be added to these next year and will ring the changes!
 
Well, apart from saying hop on over to the Pinaddicts Challenge Website where you can follow the linky to see the December entries and take a look or have a go yourself....enjoy!.... all that is left for me to say is thanks for popping in to see me here......please say 'Hi' in the comments so I know you came....
 
See you soon,
Nora
xxx

Friday, 16 November 2012

Pinaddicts Challenge - November 2012

This is a very quick post as I'm busy, BUsy, BUSY!!

BUT...I couldn't let November pass without an entry into the Pinaddicts Challenge!

Can you believe we have whizzed through summer holidays, sped through September, Harvest, Halloween and Guy Fawkes have all gone, here we are in the middle of November...yes!  The Middle of NOVEMBER!!!!!!!!!!!!  I'm shocked! I'm usually there on the first possible day with my entry...but not this month!

It's all a very rushed blur and Christmas is just round the corner...school breaks up 5 weeks today!

We are having our first Christmas with Faraway Family on 8th December..... that's 3 weeks!  Eeeeek!

Christmas Pressies a-go-go!

We have some lovely little cousins in the Black Country, they are arty, crafty
do-ers...hmmmmm.....*light bulb moment* !

Louise from Sew Scrumptious!  No, no....I'm not going to send Louise....but I AM going to send her wonderful crayon rolls!  Well, no, not hers exactly....I made them from her super-duper tutorial.

I won't post the process, Louise's instructions are so good, you won't need me to add anything....so straight to the reveal......

Ta-dahhhhhh!.....

 
The butterfly fabric came from the Clothkits bargain bucket when I visited during a little weekend away in Flossie-van in September (which I don't think I got round to telling you about!). The striped fabric is a fat quarter from my local C & H Fabrics.

 
The pink and orange dotty fabrics were bundles of fat quarters from my local Hobbycraft.  I decided to give the older girl felt tips and the younger one coloured pencils.......

 
I'm sure they'll share anyway!  The ribbons were from my stash, the yellow and orange one left over from the light shade upcycle!
 
So having done those....my mind started whirring.
 
Knowing my auntie has a very unattractive plastic bag to keep her knitting needles in....ah-ha!
 
I went through the stash and for this knitting, cat lover found the perfect (very old) fabric!  Added some extra height to the roll and.......
 
Ta-DAahh!!.........

 
The ribbon was from my Clothkits purchase (they tie up their fabric bundles and kits with it), I thought it might be handy for a knitter to have to hand instead of always reaching for a tape measure! And...what a bit of recycling!
 
Here it is opened up........  I now have another 2 of these to make for my Mum and
M-i-L!

 
In addition, there was a very special birthday round these 'ere neck o' the woods, Tiny Angels Mummy, the beautiful lady here, turned 21!  (So long ago for me I barely remember it!!)
 
She's into handmade....crochet, knitting, button-y things, not making....just buying!
 
So wanting to make something one-of-a-kind for her I set to work on another hoop creation like this one from last months Pinaddicts Challenge and I thought now would be a good time to share it with you!
 
OK, here we go........
 
TA-dahh!
 
 
Fabric, beads and buttons this time!..
 
...and because I go the back neater this time...I don't mind showing you!...


So there you have it, my entry for this month.  Why not hop on over and take a look at the other entries or enter something yourself, you can find it here.
 
'Til the next time (and I am aware that we need a HUGE catch up), take care,
 
Nora xx
 

Tuesday, 2 October 2012

Pinaddicts Challenge - October 2012

WELCOME!  Thank you so much for popping in.

Well, here we are again...as happy as can be.....

I love this time of the month......Challenge Time!!!! YAY!

My chosen subject came from Pinterest, but had no tutorial or anything as the blog it came from closed and went somewhere else :(

Here is the picture.....


Some time ago I won 2 pints of buttons on an EBAY auction...they were a mixed bag (or glass!) of wooden, leather, metal and plastic.  Many from the 1940's, 50's and 60's.  The sorts of things I remember on my Nanny's coats and cardigans.

Also some time ago I bought a blind from Next.  Perfect colours but when I came to hang it it had a wonky side and was FAR to long.  I set about undoing it so that it fitted in the recess of my landing window, un-wonked the sides and chopped a great load of the bottom!
 
What do you think?


Well, this bottom bit I hacked off was nice fabric, far to good to just throw away, so I stashed it for a rainy day!

AND.... the rainy day arrived (well lots of them actually if you've been in the UK for the summer!).  I took the left over blind fabric from my fabric stash and cut a suitably sized piece, some interesting buttons from my button stash and a range of green floss from my floss stash.

I found an old hoop used for cross stitching.  I found some felt.  I used the inside ring of the hoop as a template on the felt a marked around the inside of the ring onto the felt and cut out the circle.  I put this to one side for later.

I laid out my buttons roughly where I wanted them on my blind fabric, shifted them a bit, swapped a few round and when satisfied with the look used yellow floss to sew the buttons on so that they all had the same centres .  I used my various green colours to make back stitched stems.  I swapped around the colours so no two the same colour were together and then sewed little chain stitches for random leaves.

Once finished I turned to the back and pushed the rim of fabric at the back over the inside rind of the hoop, laid the felt on top and slip stitched the felt to the edge of the fabric.

I found some lovely red gingham ribbon....yes, in my ribbon stash.  I made a loop over the tightening mechanism on the hoop.  Separately I used another length of ribbon and tied it around the loop and made a bow to finish it off all pretty and kitsch!

So wanna see my finished article?  Of course you do!

I am so extremely, dizzily, Over-The-Moon pleased with this!  Ready......?

OK, Ta-DAAHH!......


I hope you like it.  It now takes pride of place in my lounge.....not in a flashy, showy place, but it is there (one of only 2 things hanging in the lounge at the moment!).

If you can sew, you can do this.  It might be, like me, a stash busting project that won't cost you a penny, just some time gathering up stuff.  If this isn't recycling or upcycling....I don't know what is!

I'm linking up to the PinAddicts Challenge for October, why not hop on over there and see what other wonders have been created....or enter something yourself.  If not this month then look on your Pinterest boards, pop it in your diary and join us next month for some creative crafting, blogging, swapping, admiring, commenting and general fun!

Thanks so much for dropping by, I've really enjoyed your company.  Please don't leave without at least saying goodbye in the comments!  Thanks xx

Nora 

Thursday, 6 September 2012

PinAddicts Challenge - September 2012

It is so nice to be back!

Last month I missed the Challenge as I was on holiday....very nice, but very odd not to link up , share, ooo, ahhh, comment and generally have some crafty fun.

However......it did allow me to finish working on a little crochet project that I had started for August (but ran out of time and ran out of umpf when I realised I couldn't blog it anyway!).

It was inspired by.....

Wait for it.....

Promise you won't laugh?

Hmmmm, OK, take a look at these..............

 
Fab aren't they? 
 
Take a look here on the Purl bee, the story unravels and the instructions are great....there are also LOADS of posts about crochet and also knitting, sewing embroidery and other craft projects, everyone that I've looked at has THE most fantastic instructions too.
 
Not thinking that I would be very successful at this I chose a cheap yarn.....
 
 
......purple, jade and pink Stylecraft Special Double Knit available from Deramores currently at £1.99 per 100g ball....there are 47 colours to choose from!
 
Being 100% acrylic, I thought it would be quite hard wearing for a pair of slippers too!
 
I decided to use two colours (purple and jade) together to make the soles of my slippers.... just a little more hard wearing again.
 
You can see the sole here with sides and toes crocheted on.....
 
 
Here is a sketch of how I crocheted mine together, start with edge 1, as you go you'll work out which sides are decorative and which actually join squares.....
 
 
So here is one of my slippers all crocheted up and awaiting its ends to be sewn in......
 
 
And the finished article, all cosy and warm and ideal for trotting around the house in......
 
Here we go....
 
Ta-dAH....!!!.............

 
Mine are a little on the large side just now as I am wearing thin or no socks, they do still fit though.....but as the winter goes on and I move into cotton tights and thicker socks, they will comfortably allow for the increased foot size!
 
They are a little bit bonkers (like me!) but very easy and extremely comfy...go on, you know you want to.....give them a go!!
 
Can't crochet.....why not knit the squares....use up all those bits and make them multi-coloured.......embellish with pompoms!!  The possibilities are endless!
 
Have fun, I'm off to look at the other PinAddicts Challenge entries, if you want to see them or maybe enter, then click here .....see you soon,
 
Nora xx


Monday, 2 July 2012

Pinaddicts Challenge - July 2012

Again...what to do....what to do....?

I don't know came the reply!

Hummffff! *finger drumming*

I have a few things on the boil at the moment.....and somewhere along the line, the inspiration has bound to have come from a blog (I've almost given up on magazines and almost entirely read blogs and pin gorgeous things to make on Pinterest..... it's saving SOOOOOO much storage space!)

Then as I surfed my boards an idea popped up......

It all began months ago with our very own, lovely Louise Horler whose blog is Sew Scrumptious ....I'm not quite sure how it happened now...but I read her blog about Little Dresses for Africa...don't know about it?

Look here!!

Anyway...I decided to hold a charity 'Sew-In', however, I became quite ill and wasn't able to hold the 'Sew-In'...BUT....being at home, I did have time and energy (sometimes) to whip up a few dresses, moreso in the last month.

I've had this one on Pinterest to keep me inspired......


It's from Bow Mama Hairbows..... isn't it sweet!

Anyhow.....I hope my Pinaddicts Challenge buddies and Louise won't mind a shameless plug for this cause and sharing my dress reveal!

Most of the fabric was from my ENOURMOUS stash which has remained hidden for years!  (Lost my sewing mojo!) The pink check fabric was supposed to be a dress for me (decades ago!!), but I can't tell you the pleasure it gave me to chop it up!

My Aunt gave me miles of elastic and some bias binding, I won more bias binding on an Ebay auction!

I took the instructions and templates from Louise's blog.

I just can't hold back anymore.........

I'm far too excited!!!!!!!

Ready......?

TA-DAAAAAAAH...!


I'm sorry that this months entry isn't very photo-y, but I didn't take any as I went along with these....however....if you want to see some photos-as-we-go, take a look back at this from February.

This is my little roll before it was packaged up and sent to Louise......


I hope the little girls like their dresses....'every little girl deserves a pretty dress'.

I hope it inspires you to have a go, they are easy, if you don't sew...find a friend that does and buy them the makings of one dress and ply them with tea & cake whilst they make it for you!!

Louise...the dresses will be with you soon with very much love.

Nora xx

P.S. This post will pop up whilst I am on my way home from a weekend with my Hub....I will update it with the BlogHop/Linky details for the Pinaddicts Challenge when I return.....if in doubt look up Louise at Sew Scrumptious as she usually takes part!  Thanks! xx

P.P.S. We're back and the link is here, take a peek and enjoy! xx


Monday, 4 June 2012

Pinaddicts Challenge June 2012

Ever since I saw these I REALLY wanted to make one.

I popped it on my Pinterest board so that I could trace back to the blog called Design Dazzle and further back to the tutorial by Living With Punks.

So early in April when I was after my next Pinaddicts projects, this jumped out at me.....


I wasn't sure how I would get on with the piping.....but braved it anyway!

I used 3 pieces of fabric left over from making a blind for Little Ladys bedroom (all Laura Ashley) and picked up the piping from The Cloth Store in Horsham.


I folded some dressmakers paper into a quarter and drew an arc 8 inches from the centre to make a paper template like this............


Open it out and you have a 16" circle.......


 Pin it to your fabrics and cut 2 circles like this...........


and pin the piping to the round pieces of fabric like this........


Make your handle if you want one and attach it to the long length of fabric (sorry no photo but I'm sure you'll get the idea when you see the finished article!)

Sew the piping to the circles, do it in a contrasting thread and there's no need to be 'snug' this time around (you'll see why later).

Take the long length of fabric that is the side and with wrong sides together pin it to a circle, easing it around the curve, like this.........


(Sorry, not a great explanatory shot!),

Where the 2 ends of the side meet, just overlap them laying them to one side for stitching.  Stitch round, close to the piping (with a zipper foot) and make it snug...you'll need to follow the contrasting stitching....get it now!

Repeat with the second circle.....


The tutorial says to leave a gap for stuffing.  I didn't as I didn't sew up the side seam and used that opening for stuffing instead.


I stuffed it and hand stitched the opening closed.  I didn't have too much trouble with the piping either, this is where it 'joins' .......


Not bad eh?

So are you ready for the big reveal?

{sooooooo excited to show you}

Ta-Daaaahh!!.......


What do you think?  My Teenage Daughter is so impressed she said it looks shop bought!  And as expected she's put in her order for one with a pocket on the side for her iPod, remote and/or phone!  Nothing too demanding then!!!!!

Little Lady loves to sit on hers a flop backwards into a roly-poly, she's lugged it up and down stairs like she can't bear to be parted from it!  The best is when she flops on it and hugs it....aahhhh!

I hope it inspires you to have a go....why not miss out the piping, add pockets, use jeans for a hardwearing fabric....patchwork something together to cut the circles and side from...pop a button through the middle...instead of using piping why not try ric-rac, fringing, gathered ribbon......I could go on...the possibilities are endless!

If you want to take a look at the rest of this months entries then Blog'Hop' on over to   Simplyoutnumbered, why not join in with an entry from your Pinterest Boards.

Anyway, I'm off to finalise next months entry...see you soon,

Nora xx

Thursday, 10 May 2012

Pinaddicts Challenge May 2012

Oh my!!

It is here AGAIN!!

Is it me or does this come round really quickly each month?

Unfortunately I have spent since last Thursday night in bed, suspected Glandular Fever!  So although I did realise it was THAT weekend, I was less than enthusiastic or energetic about getting out of bed to gather my bits, finish my entry and photograph it!

BUT...... the last 2 days I have at least got dressed after lunch AND today although still unwell (and in bed with DD13 who feels the same) I feel more inclined to give you the run through on this months Pinaddicts Challenge entry.

I scoured my Pinterest boards for something to use bits, something I wouldn't normally attempt to make (just admire enviously) and something therefore that would challenge my Make-ability (or more like my ability to make it!)

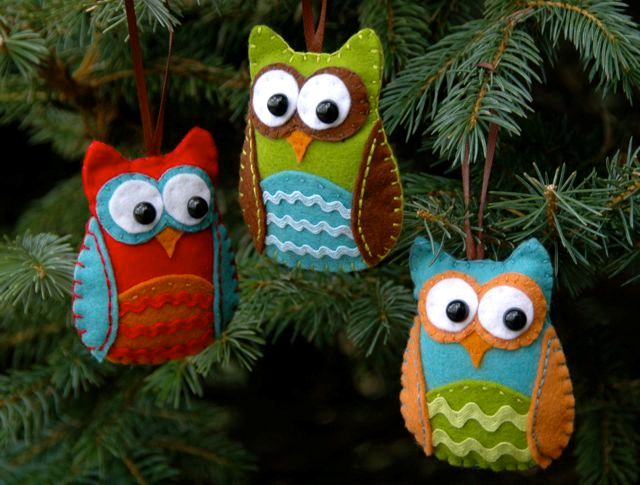
I came to a rather odd conclusion (because my subject is supposed to be a Christmas Decoration......) but at the moment these little fellas seem to be very 'In'...so I thought....what the heck, he's gorgeous, I'll go for it!

Want to see what I'm aiming for?

Well, here it is..............


The tutorial and pattern is on the Juicy Bits blog wriiten by Jessica....extremely talented and Maker of such PeRfEcT items....go take a look for yourself...

I gathered my bits together, first revealed to you here with a number of other UFO's (UnFinished Objects!) and WIP's (Work In Progress!), remember.....


I wanted to achieve something from nothing....NO MORE SHOPPING!!!

The oddments of felt came from other projects (mostly executed by Teenage Daughter and strangely not as bright as I had hoped), a small string of sequins (I don't know where they came from, but I think with a bag of trims and lace from my Auntie!)

Buttons which have either been donated (yes, I am the receiver of all sorts of odds and ends from family and friends) or cut from old clothes, or the spares with new clothes.

Most of the ribbon of the size required to hang my owl from is that that I have is cut from the shoulders of new clothes...... you know the annoying little bit that they use to hold the clothes on the hangers.  Or sometimes (like Laura Ashley) they use ribbon to put price tags on the clothes.

Re-cycler or hoarder.....mmmmmm!  Difficult call!

Anyhow....... printed the pattern (and was shocked at the small size!)

Cut out the pieces.......


And started.

I'm not the most delicate of people (or so I thought) and imagined I would struggle with such a small item, and although mildly fiddly, it wasn't too bad. 

It made me rethink....maybe I'm not as 'finger & thumbs' as I thought I was.

Maybe I shouldn't shy away from small, delicate things in the future....(and now I've told you, I shall have to believe it!)

Well, it all came together quite nicely.  I did a running stitch around his little tummy, 'V's on his wings to represent feathers and sort of spoke looking stitches around his eyes to immitate the way the feathers open out around the eyes of owls.

Having NEVER attempted a Blanket Stitch before, my daughter suggested I go for a tutorial on YouTube, which she found for me....gosh it soooooooo easy if you go through from the front to the back!  Silly me had be trying to go from back to front...no wonder it didn't work!!!  Doh!

This morning I finished my Little Owl Decoration (already claimed by my Little Lady and enviously drooled over by Teenage Daughter.....I can already feel another one coming on!)

Want to see?

I'm so ridiculously excited by my Tiny-But-Perfectly-Formed Make...... teehee!

Ready......?

Ta-Daaaaaaaaaaaaaaaaah!!!........


Wanted a shot in the hand so that you could see how tiny he is.  Does he look tiny to you?

A not-very-good shot of him hanging from our Banana Hook!


....and one of him lounging on the sideboard!  (Lazy creature!).......


I have Achieved!  He cost me nothing but time, challenged my view of my abilities and is a unique and rather sweet decoration from my Pinterest board which ticks the Challenge box for May 2012!

If you get a chance pop on over to But Why MummyWhy? who is hosting the BlogHop this month, you can see the other entries and maybe enter something yourself!

I'll see you soon....the blogs are backing up with all this illness!!!!

Love Nora
xx

Monday, 2 April 2012

Pinaddicts Challenge - April 2012

Oh the excitement!

There I was posting this on the blog yesterday when............ I realised that the first Monday in April meant.......

Pinaddicts Challenge!

(breath, breath....in through the nose......out SLOWly through the mouth...calm, calm....)

SO, my moment for April 2012 has arrived!

It started out with this from Two Brown Birds on Pinterest, actually I've got a few different ones but this is my favourite.

Then there was a purchase!

I shared that with you in Stash and Stuff.  Remember this.....


....purchased from Fabric Rehab?

Following this tutorial, I cut templates from stiff paper (I have a file I keep templates in for future Makes....so I always make them from something sturdy!)....look....


Pinned them onto my fabric, cut and laid one piece on top of the other making sure the shorter sides matched and right sides together......


The larger piece will bulge and look odd, but that's fine, you are doing it correctly!  Here's mine....look....


Sew the short edges together (not my neatest attempt....but don't worry if yours looks scrappy...it won't show in the end!  Promise!)


Open it out with the small right side facing up....you'll notice the you get a strip either side of the larger piece of fabric.....that is correct.  Make sure these sides are even and press with a warm iron.......


Fold the piece in half, long sides together (in my example with the two plain pieces touching) this will give you an exact centre fold.........unfold and fold the two edges in to meet on the centre fold and pin......like this......


Sew across the short ends......


I wanted a really secure hem as this is likely to get LOTS of use, so I zig-zagged and did a straight stitch (sorry about the blurry pic!), I then pinked really close to my zigzag (it made the ends less bulky)......


Now turn the right way out......

Ready.........

Ta-Daaaaaaaaaaah!.....


Take a pack of handbag tissues, remove the plastic wrap and pop them into your tissue case.......


If you are eagle-eyed, you will have noticed the changes of fabric throughout these photographs...yes, it could only mean one thing........

(Apart from me forgetting to take photographs at every stage of work on the first example......over-excitement again!)

It means that both Fiona from Two Brown Birds and Louise from Sew Scrumptious were quite right!  You can't just stop at one!

Huh-herm.....look.....


LOVEd making them, so quick and easy.

Teenage Daughter and I have had LOADS of comments about them.

So we reckon they'd make ideal gifts for friends and accquaintances, teachers, work colleagues, fund-raising efforts....the list is endless.

Go on....give it a go!

So there it is in all its glory......my Pinaddicts Challenge Entry for April 2012!

Thanks for popping in....see you soon!

Nora xx

PS  Now if you look down the right hand bar you will find the 'Bloghop' for the Pinaddicts Challenge....why not take a look at the other entries or better still....JOIN UP!!!  Nx