Showing posts with label Buttons. Show all posts

Sunday, 14 February 2021

Scrappy cloths

Since we moved to the North Pennines, and since Missy watched an offering from the wonderful Sir David Attenborough which left her in tears and determined to lighten our footprint on the planet, we have been on a mission! 

We started small and are getting better at cutting down on plastic, reducing the rubbish we send to landfill, buying all that we can second hand, finding ways to use what we have until the end of it’s life and above all being inventive!

Of course, with a child, clothes are something parents seem to buy lots of!  They grow so quickly!  Missy is the 5th of 5 children, but the youngest of the older 4 is a girl, but 10 years older than her, so there aren’t too many hand-me-downs.

We don’t go mad with a full school uniform for every day, but clearly you have to have one spare set!  And it all gets a good deal of use.  So, by the time the school year ends, the sweatshirts and trousers are usually OK to pass on, but the shirts are pretty grim!  Paint, lunch, biros and grass stains take their toll.

So, what can we do with them?

Well Missy had 3 pretty polo shirts that I held on to wondering how they could be repurposed and then the lightbulb came on in 3 ways….

1 – they have pretty buttons that can be reused.

2 – from the underarm to the hem, they are square

3 – there is an amount of ‘scrap’


I cut the side seams off, cut horizontally across the chest from underarm to underarm and removed the buttons.
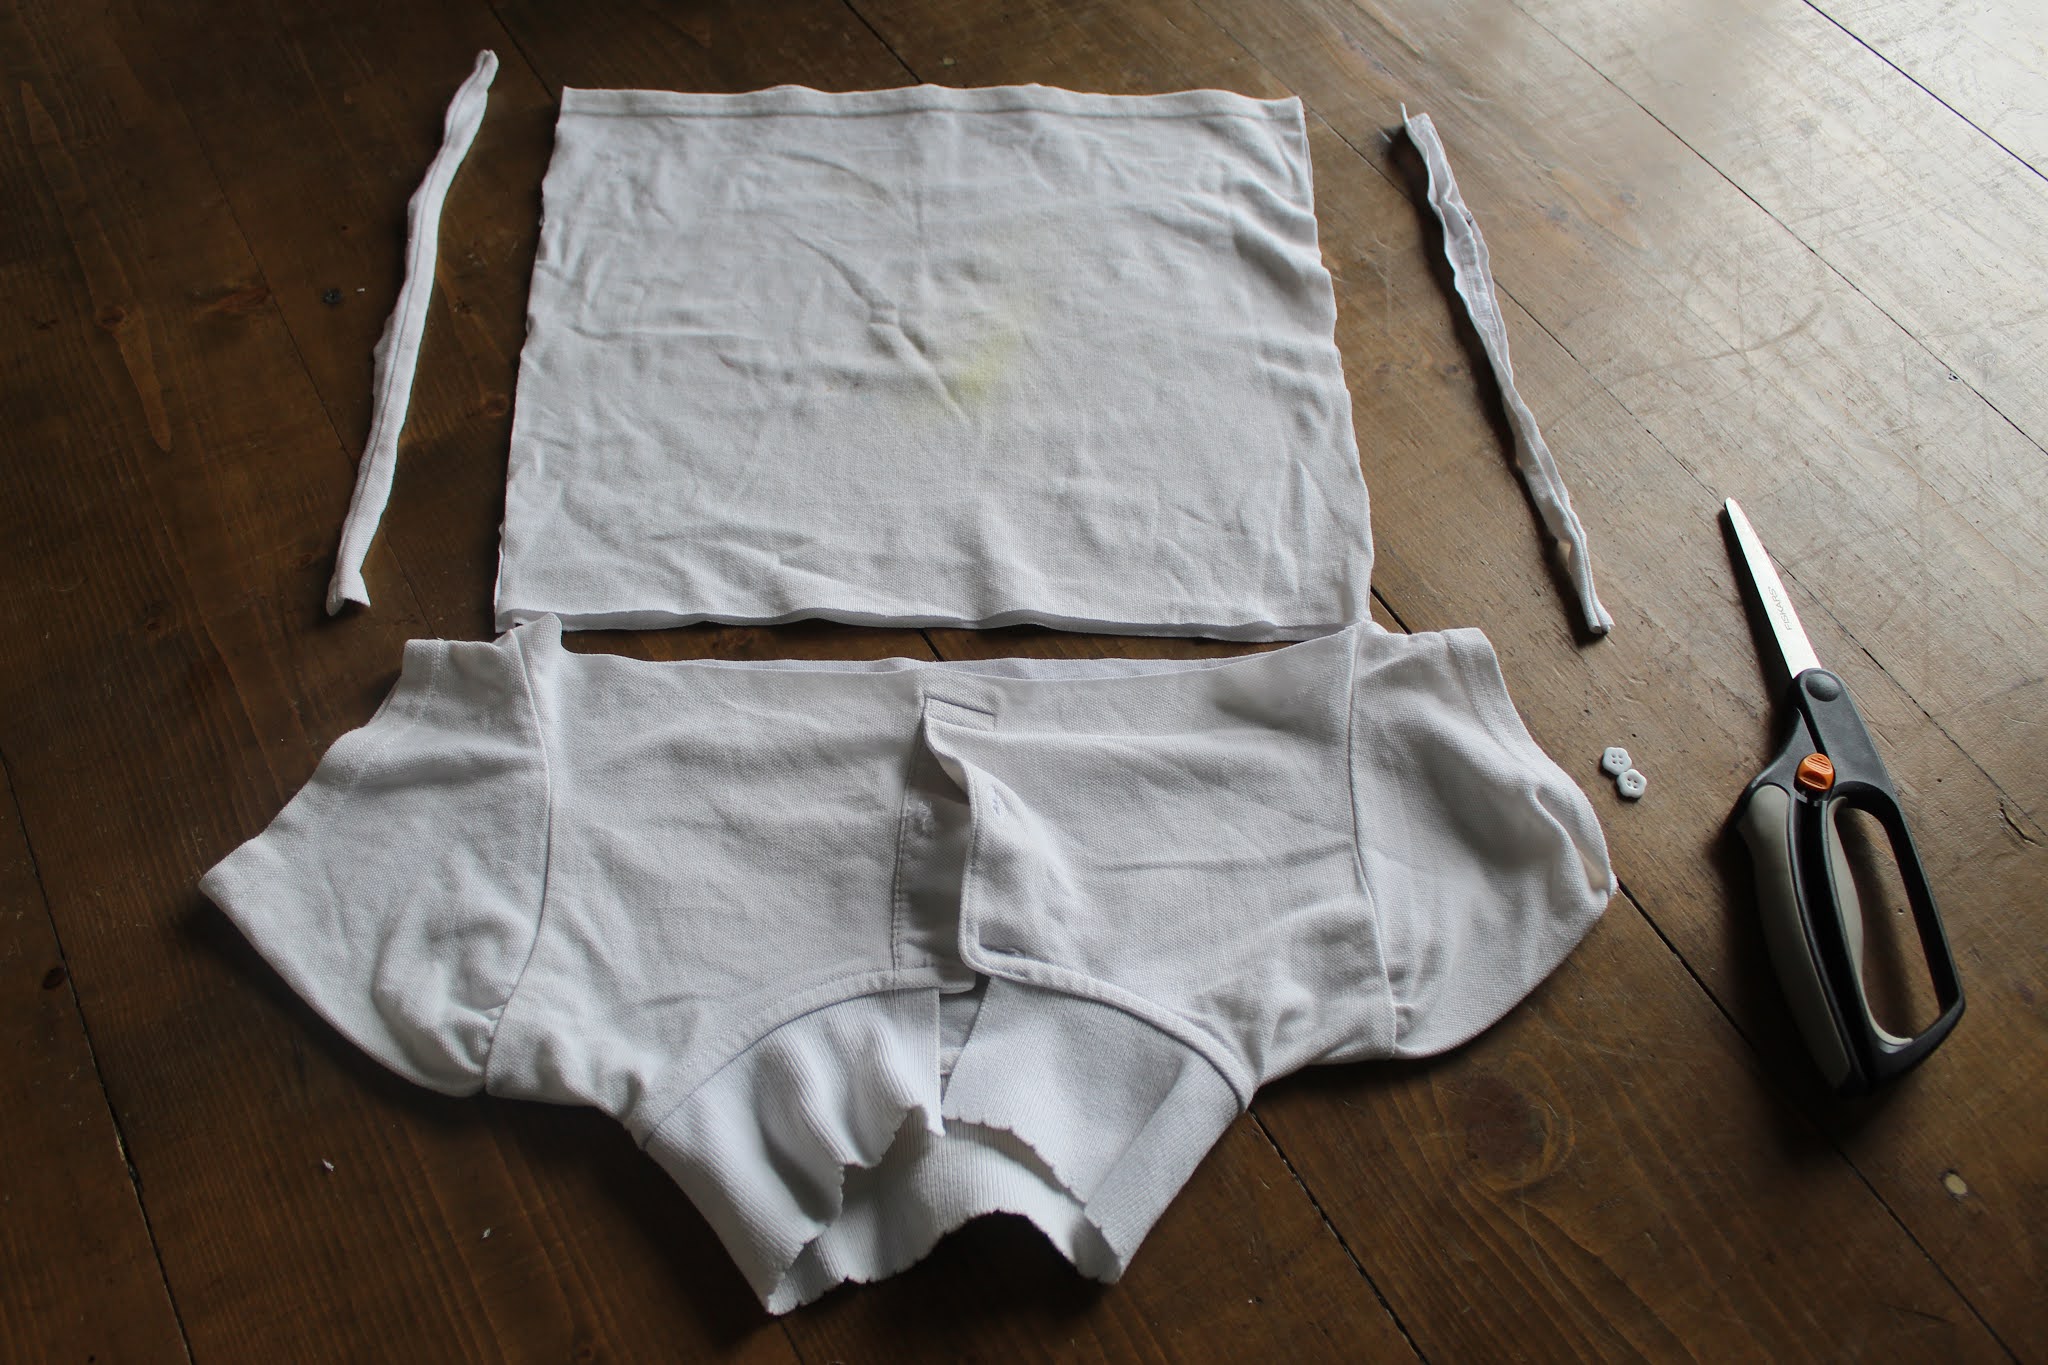


The buttons went into my button box.

The 2 squares from each body of the shirts was overlocked around the edge to make cleaning or spills cloths (instead of paper towel) and all the ‘scrap’ including that created by overlocking will be joining my ‘stuffing’.


‘Stuffing’ is all the offcuts of fabric and threads from projects that are too small to even use on patchwork and they go into an offcuts bag kept at the side of your workstation. 

Many dressmakers are now employing the ‘Make do and Mend’ ethos of their Granny and making a stuffing bag which is simply 2 squares of scrap fabric (or old sheets or curtain, hubbys shirts etc), seamed on 3 sides to make a pouch and into that putting waste.  When full it can be used as a cushion pad, or smaller clumps of the waste can be used to stuff doorstops, draught excluders, toys…..the options are endless.  I often find I have more projects than stuffing….and nothing to put into landfill!!

Mine swallows up offcuts from cutting patterns out of fabric, threads, selvedges, the ‘trim’ from using the overlocker…..and more recently laddered tights AND….yes, you know whats coming…the chopped up scraps from those school polo shirts!

I’ve recently got back into knitting and apart from keeping a small ball of the yarn (with the ball band) for repairs, all the offcuts from sewing up my projects will be heading for my stuffing bag!

So, there we are…..cleaning cloths, buttons and stuffing!  No waste!

I have to say that I have become ridiculously excited when I find a new use for things and can keep my bin free of unnecessary waste.  Things in this house get used, used and used.....if they are made of natural materials, they may find themselves added to the compost heap....or like a rather dodgy looking wooden spoon, used for lighting the fire!!

Let me know what new and inventive ways you have found to reduce your reliance on landfill and take responsibility for your waste.

See you very soon,

Toodle-ooo

Nora

xx


Saturday, 13 June 2015

SAILOR PANTS!

Yes! *punches the air in a most un-lady-like manner*

Do I feel great right now?  Yes.

Am I proud of myself? Yes.

Am I proud of my Little Lady's photography skills?  YES!

Grab a cuppa, make yourself comfy....we're up for a TA-DAH!

This journey started last June whilst on holiday when I stumbled across the blog of lovely Jane at Handmade Jane..wow...is she inspiring!  And so willing to share her knowledge and be of enormous help to allow those sewing-ly challenged amongst us to get a leg up in the dressmaking stakes.

I love her style and also her colour choices (I love a bit of red myself!).

She lead me on to many other wonderful blogs and sites like Gertie's Blog for Better Sewing, The Little Tailoress, But it Can't Be From Dolly Clackett, The Vintage Pattern Files, Jennifer Lauren Vintage, Burdastyle.....*breath*..... and so I could go on...and on, and on!

What came out of this holiday rummage was that I REALLY wanted to sew something for myself.

I like unique things, and I'm happy to buy from charity shops so that I'm less likely to wear something someone else is sporting and there are some unusual finds too.

Problem?

Fit!

Solution?

Make it yourself for a better fit!

OK.  Here we go.  By the end of the holiday I had bought Colette's Jasmin Blouse, Jennifer Lauren's Bronte Top and Burdastyles Sailor Pants.

Weirdly, I later looked for the Vintage Simplicity 4238 and made that first....told you about that here.

I've also made an apron based on a pattern I found on Pinterest (more about that here...)

And some PJs which I told you about here, (but haven't yet updated you on another 2 pairs!!)

So, FINally I get around to those sailor pants!  Tentatively!

I can't tell you much about the fabric other than I got it from Fabricland for around £5 per metre, it is navy blue and it is trouser-y stuff...what exactly I have no idea!

You'll have to PLEAse excuse the state of the trousers as I had worn them all day at Little Lady's party when we went bowling and picnic-ing in the park....well worn and crumpled!

So...ready....here we go.................


Little Lady didn't quite get the shot right, so let's try again.......


Not bad at all and for a front detail shot.......


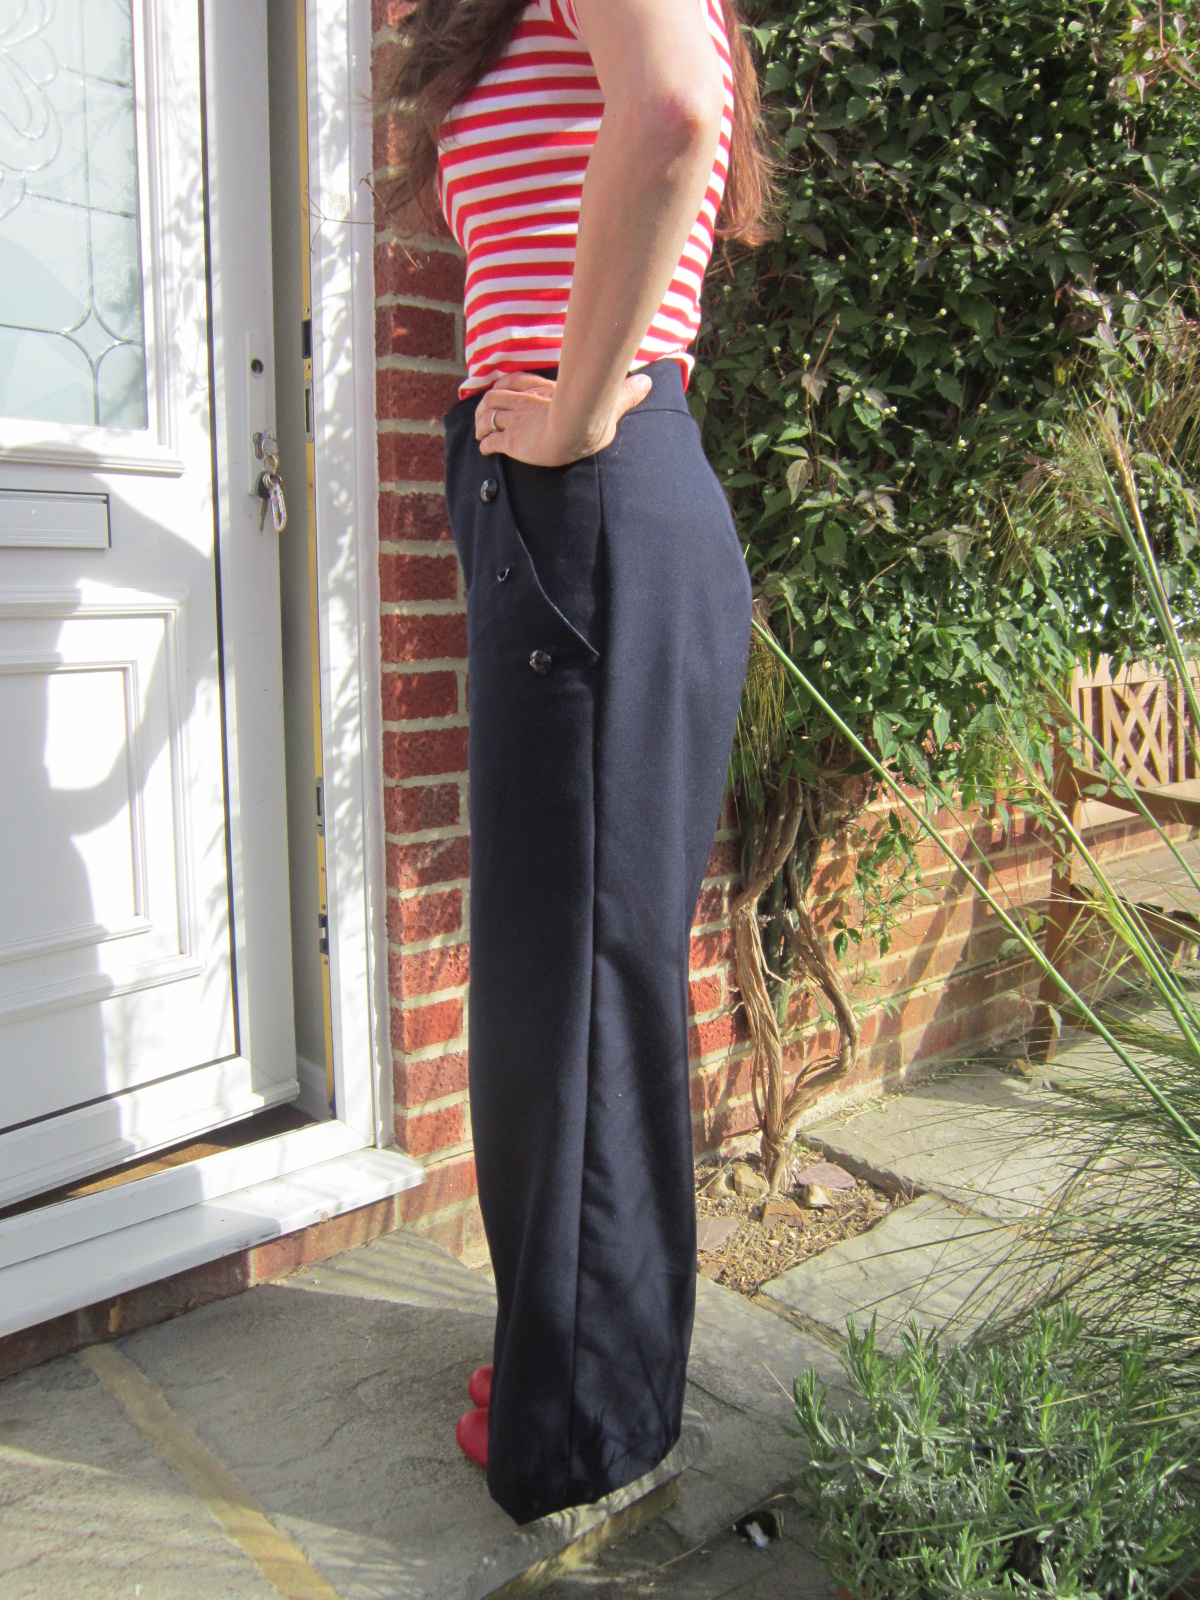
....and a side shot to show the fit......


I L-O-V-E them...what's not to love?

I'm putting them up as my May Make on #mmaw2015.

I am sooooo inspired!  I have the Retro Butterick 5605 out at this moment, instructions being absorbed, bodice cut and I'm also contemplating cutting a shorts version of these Sailor Pants in a lovely floral fabric I found in the remnant stack at my local fabric store.

I'll keep you posted on progress......finally, sorry for the radio silence and finally, finally...thank you Jane xx

Love
Nora
xxxx

Wednesday, 6 May 2015

Vintage Simplicity 4238........... Ta-dah!

Oh, I just can't believe it....blimey I sound like Victor Meldrew!

But seriously...I am pretty blown away by my achievement and I have to say a HUGE thank you straight off to....

Jen over at My Make Do and Mend Year for the nudge into actually getting started on clothes making with her challenge #mmaw2015 (Make Me a Wardrobe 2015) which I signed up for back in January.

And also to....

Jane over at Handmade Jane whose blog I discovered whilst on holiday last year and who has inspired my handmade journey and greatly influenced my first EVER Sewn by me Me-Make....woohoo!

Thank you both so much from the bottom of this skippy-hoppy-happy heart!

I bought Simplicity 4238 from a lovely lady in the US and was so happy, excited and terrified when the pattern arrived.

I popped to our local fabric shop to snaffle up 1.5m of gingham to hack at.....don't want to ruin my lovely lawn and if it all worked out then I would have a fab gingham blouse to wear!

I did have a bit of a mare with the collar which I told you about here and the solution very soon after which I retold here.

Up to the collar was fine, after the collar was fine and the comforting words of Jane to say that she had had the same trouble with the collar made me feel more confident (well, it wasn't just me!!)

Once made I did make a few adjustments to the fit:

1.  It sat too low....my darts were too low.... My solution was to lift the blouse at the shoulders.  I cheated by graduating the shoulder seam out rather than fiddling with the collar.  When I make the next on I shall most definitely take out 1cm back and front on the shoulders. (note to self....remember to change the collar!)

2. it was a bit too baggy round the back.  My solution was to extend the 4 back darts to about bra strap height (13 inches down from the shoulder to be exact!).  On the next one I think I shall sew the side seams as far as the waist with a larger seam allowance to bring it in a little....it really didn't need much!

3. It was a bit gape-y around the midriff.  My solution was to search wildly through the button box to see if I had 1 more of the vintage buttons...phew!  Yes...so I made another button hole!

4. I didn't like the look or the feel of the armhole facings.  My solution was to do what it suggested for the hem and finish with bias binding turned to the inside and top-stitched.

Lovely!

I haven't matched checks and other fussy stuff as this was just a practice run...but I'll tell you what...it's OK and I can bear the odd stray away from the lines...why...because I made it!

Want to see what all the excitement is about?

Come on then.....ready.......

Ta-daaaaaaaaaaaah!........


It was a bit windy so the collar flapped a bit and The Hubs, acting as blog photographer, couldn't quite get what I meant about holding the camera more at waist height and pointing it across at me rather than down....so now I look like I'm bending forward and the blouse is really quite 'waisted'.


Bless him...he's done the same with this one but it does show off the neck darts and the lovely pinched in waist....shame he didn't tell me that the collar was a bit crumpled before he took the photo!  I can see he needs more training!

So there you have it...one Vintage Simplicity 4238 blouse.  A bit rough and ready but a good first blouse and practice piece for more to come!

I'll be back soon to share more of my doings, in the meantime,
Take care, 
Nora
xxxx

And cheerio from Victor!


Tuesday, 31 March 2015

Finished Quilts....... With Labels!

So once my labels were printed using the method in my last post, I was finally able to photograph and gift!

My Crafty Friend, Carol, had her quilt last year, but when I explained that I had sussed the label conundrum, she returned the quilt so that I could add a label...so here is the quilt....


...and the label.....


I've also FINALLY finished my cousins Arsenal Quilt, I told you about it here and after the pining marathon and then the hours watching TV and quilting it with buttons, I reached the point of binding.

I had previously cut the binding but wished I had waited and cut it wider to cover the variation in the yarn squares (some had been sewn more tightly than others).

No matter, I simply unfolded it and used it like bias tape by sewing a single edge to the edge of my quilt with an almost 1cm seam allowance to cover all the ins and outs.  Once I'd sewn all round I turned it to the back and hand stitched the binding down as usual.  This also took hours!

But I think the result along with the label was well worth investing the time and I hope my cousin likes it!

What do you think?


Huge isn't it!?


This picture shows the button quilting, binding and homemade label!

More makes coming soon, until then, take care
Nora
xxxx

Sunday, 8 February 2015

A HUGE binding project.......The Arsenal Quilt!

....and it's not even mine!

My Aunt has been busy knitting squares to keep her self occupied whilst she's been recovering.

Her daughter is an Arsenal football club fan, so the squares are red and white!

She has sewn them altogether, I can tell you it weighs a-L-ot.

The measurements are 130 inches by 85 inches.

I need to quilt and bind this so I've decided that as the only other colour in their logo is the golden yellow of the gun, that I will button quilt and bind in yellow.


I bought a bag of mixed yellow buttons from KosiKrafts on Amazon for £2.59 (including P&P!)


and some Canary Yellow fabric from Dolly's Craft Corner, also on Amazon for £3.18 per meter and free delivery!


I used the calculator on Quilters  Paradise which advised me that on the width and length measurements and using a 2.5 inch binding that I would need just under a yard of fabric, much less than I had imagined I would need for the binding.

It took me over 2 hours to lay out the vintage quilt my aunt gave me to back it and the yarn-y top and pin it to together.....


I'm tellin' you...it's H-U-G-E!

So I'm at the stage of sewing a button on to each cross where four knitted squares meet.


I'm simply using red and white Stylecraft Special Double Knit which is currently available at Wool Warehouse for £1.69 per ball with free delivery on orders over £25 and if you have this months Simply Crochet Magazine Issue 28, you'd get a 10% discount on that too!

All I'm doing is sewing through the button and all layers, back up through the button and tying the ends off to secure...not rocket science, but it looks effective.

So far I've done all but 40 buttons by sitting in the evenings watching New Tricks and securing about 20 buttons at a time!  2 more episodes to go and I shall be on to the binding!

I have to say I am looking forward to hand finishing the binding more than machining it on and having to manoeuvre the vast weight of blanket and quilt around my machine!

But that's for another day, today I shall concentrate my efforts on BUTTONS!

I'll be back soon with another update on something...not sure what yet!  So much on the go.....

Until then, see ya
Love
Nora
xxxx

P.S. The buttons are on!  So it's soon to be binding time.

Wednesday, 1 October 2014

Little Lady and the Sewing Machine Adventure.....

Nope, not the latest Ladybird book, but our real life adventure with another book.

Hoping Louise at Sew Scrumptious might read this as her daughter has just received a gorgeous new purple sewing machine for her birthday...Happy Birthday Isabella!

Here is the book.....


....and here is the very first project chosen by Little Lady.....


...a Monster Scooter Bag!


I traced the bits onto freezer paper so that we had them for future reference (I pop pattern pieces in an envelope taped to the inside back cover of books).  She helped me cut some with scissors and supervised me rotary cutting others!


Here she is pinning her stripes......


...and here she is sewing them!


Yep, that's all her with no interference from Mummy!


Here's the eyes sewn on to the bag flap...how cute is all that skew-wiff sewing!?


And here he is pinned ready for the all-round-the-edge-sewing bit.


And there is one VERY happy 5 year old with her Monster Scooter Bag! Great job Little Lady!  What a great book too, nice pattern templates, easy instructions...nuf said!

Back soon with more Little Lady Sewing....she'll be needing her own blog soon!

Ta-ta for now,
Nora
xxxx

Friday, 30 May 2014

Crochet and Sew Dress

I realised a few days ago that I hadn't told you about this sweet project........... and it is also a TA-DAH!


Lovely!

My creation came from something I saw in a magazine, it wasn't quite right as I needed adjustable straps (if I'm going to invest time in making something, I need it to last!!!)  So I came up with this.......


Here's a closer look..........


Do you like the sweet little buttons?

This other dress also had the same sized back and front, apart from saving on some rows on crochet, I just thought it would look nicer with a slightly lower back, like this.......


I got the pattern for the skirt bit from this pattern.................


I had previously used it to make this yo-yo embellished dress and thought it was an ideal skirt.  I simply machine stitched it onto the crochet top leaving a little edge of crochet overhanging like this...........


Tiddly Toes (who is no longer so Tiddly and I may have to start calling her Little Lady!) is thrilled with it, we can't wait for some sun.

So there you are, all up to date on that one, I shall be back soon with a May update, a charity project and a skirt that I first told you about here!

Until then have yourself some happy hooky, sewing, baking fun!

Love 
Nora
xxxx

Monday, 30 September 2013

Little houses

On a whizz about BlogLand the other day I pinned the following on my Pinterest board from The little house by the sea.


In fact I pinned a few things, this one quite some time ago......


..... and I have some magazines and books, all marked at the pages to do loosely with 'houses', including this from Mandy Shaw of Dandelion Designs which featured in Issue 21 of Simply Homemade magazine.

 
It all started with wanting to design a Tooth Fairy thing-a-ma-jiggy to hang on doors to put teeth into to escape from the groping under pillows and potentially disturbing the recipients of pennies.
 
I didn't want a tooth shape, or necessarily a bag or indeed anything with a fairy (not too appropriate for boys!), so I started thinking about Fairy Cottage....what would a Fairy live in?

I looked for toadstool houses or little whimsical cottages as inspired by a freebie in this issue of Cross Stitcher magazine.....

 
but needed to add a pouch as integral to the design.

Then on The Patchsmith the other day I saw these from Retro Mama ......
 
 
The Patchsmith had redesigned WITH POUCH!

I dug out some free fabric that came with this issue of Simply Homemade magazine a couple of months ago......

 
and I made this................

 
Here's the detail on the front.......
 
 
It is gorgeous and I love it......but it's not quite right. So I decided to do something a little rash....

I've digested all the designs and sewing techniques used in the projects that I have gathered (and they are all very similar, coz let's face it how different can you really be when 'building' a house?!) and  tried to design one myself!

It ended up a bit wonky as I wasn't too neat about placing the design on the front or neatly sewing as it is, after all, a prototype!

Ready to see my mad idea?

OK, let's go....

Ta-DAH!!!!...............

 
Bonkers isn't it? 
 
But I just adore the roses round the door and the bunting!  Here it is up close.....


I wasn't brimming with confidence but now I've finished, I am terribly excited!  Not bad for a first attempt.  My lack of drawing skills does show in the shape of my toadstool....but I'll work on that.

Fabulous little stash-buster as you only need odds of fabric and floss.

Any ideas on a better shape for my toadstool, or how to ensure the stem and top appear separate are very welcome!

Thanks so much for dropping by, nice to see you,

Nora
xxxx

Monday, 18 February 2013

Stuffed Puffs

Doesn't sound very inspiring does it?  But look........


Suffolk puffs stuffed, over-threaded with embroidery floss, topped with a button and popped on a hairband!
 
Wondered about leaves.....or maybe one big flanked by 2 small (one either side)...what do you think?
 
Stashbusting share soon....for a hobby I haven't done for a while!

See you soon
Nora
xxx

Friday, 16 November 2012

Pinaddicts Challenge - November 2012

This is a very quick post as I'm busy, BUsy, BUSY!!

BUT...I couldn't let November pass without an entry into the Pinaddicts Challenge!

Can you believe we have whizzed through summer holidays, sped through September, Harvest, Halloween and Guy Fawkes have all gone, here we are in the middle of November...yes!  The Middle of NOVEMBER!!!!!!!!!!!!  I'm shocked! I'm usually there on the first possible day with my entry...but not this month!

It's all a very rushed blur and Christmas is just round the corner...school breaks up 5 weeks today!

We are having our first Christmas with Faraway Family on 8th December..... that's 3 weeks!  Eeeeek!

Christmas Pressies a-go-go!

We have some lovely little cousins in the Black Country, they are arty, crafty
do-ers...hmmmmm.....*light bulb moment* !

Louise from Sew Scrumptious!  No, no....I'm not going to send Louise....but I AM going to send her wonderful crayon rolls!  Well, no, not hers exactly....I made them from her super-duper tutorial.

I won't post the process, Louise's instructions are so good, you won't need me to add anything....so straight to the reveal......

Ta-dahhhhhh!.....

 
The butterfly fabric came from the Clothkits bargain bucket when I visited during a little weekend away in Flossie-van in September (which I don't think I got round to telling you about!). The striped fabric is a fat quarter from my local C & H Fabrics.

 
The pink and orange dotty fabrics were bundles of fat quarters from my local Hobbycraft.  I decided to give the older girl felt tips and the younger one coloured pencils.......

 
I'm sure they'll share anyway!  The ribbons were from my stash, the yellow and orange one left over from the light shade upcycle!
 
So having done those....my mind started whirring.
 
Knowing my auntie has a very unattractive plastic bag to keep her knitting needles in....ah-ha!
 
I went through the stash and for this knitting, cat lover found the perfect (very old) fabric!  Added some extra height to the roll and.......
 
Ta-DAahh!!.........

 
The ribbon was from my Clothkits purchase (they tie up their fabric bundles and kits with it), I thought it might be handy for a knitter to have to hand instead of always reaching for a tape measure! And...what a bit of recycling!
 
Here it is opened up........  I now have another 2 of these to make for my Mum and
M-i-L!

 
In addition, there was a very special birthday round these 'ere neck o' the woods, Tiny Angels Mummy, the beautiful lady here, turned 21!  (So long ago for me I barely remember it!!)
 
She's into handmade....crochet, knitting, button-y things, not making....just buying!
 
So wanting to make something one-of-a-kind for her I set to work on another hoop creation like this one from last months Pinaddicts Challenge and I thought now would be a good time to share it with you!
 
OK, here we go........
 
TA-dahh!
 
 
Fabric, beads and buttons this time!..
 
...and because I go the back neater this time...I don't mind showing you!...


So there you have it, my entry for this month.  Why not hop on over and take a look at the other entries or enter something yourself, you can find it here.
 
'Til the next time (and I am aware that we need a HUGE catch up), take care,
 
Nora xx