Tuesday 31 March 2015

Finished Quilts....... With Labels!

So once my labels were printed using the method in my last post, I was finally able to photograph and gift!

My Crafty Friend, Carol, had her quilt last year, but when I explained that I had sussed the label conundrum, she returned the quilt so that I could add a label...so here is the quilt....


...and the label.....


I've also FINALLY finished my cousins Arsenal Quilt, I told you about it here and after the pining marathon and then the hours watching TV and quilting it with buttons, I reached the point of binding.

I had previously cut the binding but wished I had waited and cut it wider to cover the variation in the yarn squares (some had been sewn more tightly than others).

No matter, I simply unfolded it and used it like bias tape by sewing a single edge to the edge of my quilt with an almost 1cm seam allowance to cover all the ins and outs.  Once I'd sewn all round I turned it to the back and hand stitched the binding down as usual.  This also took hours!

But I think the result along with the label was well worth investing the time and I hope my cousin likes it!

What do you think?


Huge isn't it!?


This picture shows the button quilting, binding and homemade label!

More makes coming soon, until then, take care
Nora
xxxx

Using Freezer Paper to Print Your Own Labels...Ta-Dah!

It's taken me a while to get to this with a lot of mistakes and accidental discoveries along the way, but finally, I think, I have it!

I like making personalised gifts, so to be able to print my own labels and photos would be great.

I have purchased ready prepared fabric for printing on, but found it SO expensive, then through a mix of experimenting and getting it mostly wrong a lot of the time, I had a lightbulb moment that was confirmed during a foray on Pinterest where I found articles about exactly this!

This is a Ta-Dah technique rather than a Ta-Dah item!

I bought some white 100% cotton fabric.  It's not the thickest in the world, but it will work.  It is 150cm wide and I bought 30cm which is the height of a piece of A4 paper, this should give me around 7 A4 sheets at 21p each!

Slightly better value than this which I had previously purchased from Panduro Hobby at £19.90 for 5 sheets!

In addition I used Reynolds Freezer Paper from Amazon which I picked up for £5.76 (free P&P!), so at 12.1m, this equates to around 10p per A4 sheet of my printable fabric 'paper'......


I only needed my iron to attach the 2!  I took apiece of printer paper for a size guage and once I had ironed the shiny side of the freezer paper to my cotton, cut a rough A4 size.


I then went to my cutting mat and using my largest ruler and trusty rotary cutter, still keeping the printer paper as a guide, cut my bonded fabric and freezer paper to A4 size.


Here it is......


So that I knew which way to load my paper, I printed my labels onto plain paper having first marked it with a cross for orientation.....


When it emerged, the cross was on the back, so this told me that I would have to load my paper fabric side down, freezer paper uppermost.


Which I did and then pressed print!

This is what came out................


PERFECT!

Using my mat, ruler and rotary cutter, I cut my labels to size...........


And here is the finished label, ready to be sewn onto Little Lady's quilt!


All 31 pence of it!  (In fact cheaper as I could have got 4 labels out of one piece of A4!)

I have used this technique to print more labels which I shall be sharing with you shortly.

Hope this proves useful, any questions then please ask!

See you soon,
Nora
xxxx


Tuesday 24 March 2015

Fab Low Fat Fishcake Recipe

I'm sure I've told you before that I have a problem with my gallbladder and have to be careful about the amount of fat I eat.

Crafty Friend gifted me a wonderful book by The Hairy Bikers full of the everyday food they loved, tweaked to low fat.  Wonderful!


One of their recipes that I love (and have made even lower fat!) is fishcakes.....


I make up double or treble the amount recommended so that I can freeze some.

It is so simple.....

This last time I used about 500 grams or 1lb of potatoes, around 800 grams just about 1lb 9ozs of fish, I had a mix of white and salmon and I slice my spring onions (or sometimes I use chive) quite finely as I don't like to bite into huge chunks of any onion!

I boiled and mashed my potatoes, leave them to cool and it helps them to mould into rounds easily....it's also kinder to your hands than hot potato!

Poach your fish in water with a bay leaf.  Once cooked remove any skin or bones and flake it into good sized chunks...you want to know that it is fish!

So, with a wooden spoon and a delicate hand combine your mash, fish, zest of a lemon (or lime if you fancy), spring onion (or chive, you could even try coriander or flat parsley).  

Now time to get your hands dirty....pick up a lump of the mixture and mould it into a ball and then flatten and pat the sides round to prevent it crumbling apart, dip it in beaten egg and then in breadcrumbs.

I like paprika in my breadcrumbs...but I'm also going to try turmeric...it's a great health spice and cancer beater and not only has a delicate flavour, but will give white breadcrumbs a lovely colour.

Don't stick to white breadcrumbs...use your wholemeal bread too.  What I do is go through the bread bin just before a shop and ANY bread that hasn't been used gets blitzed, shoved in a freezer bag or tub and bunged in the freezer...breadcrumbs whenever I need them for fishcakes...or maybe treacle tart!

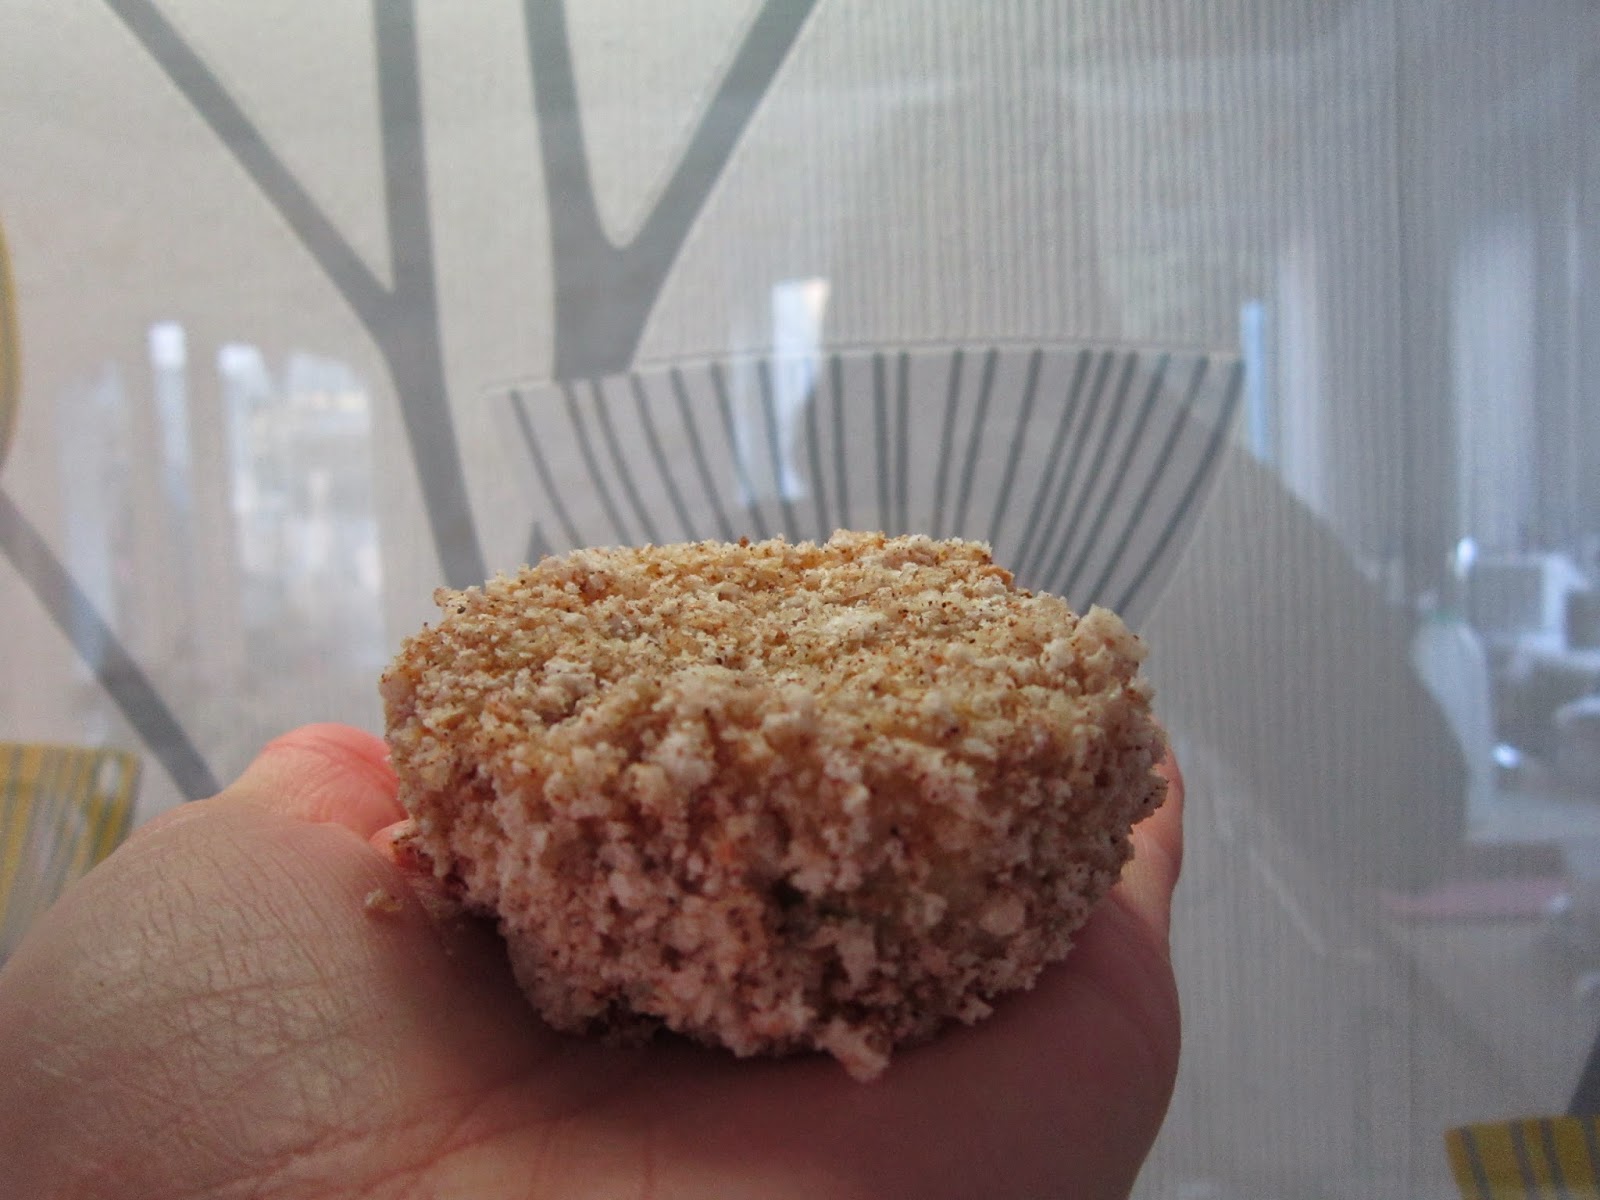
Anyways, your fishcakes should look vaguely like this......


I like mine a good size...here they are in a tub waiting for the freezer....


(Sorry it's a bit fuzzy!)

Don't feel that's the only size you can do...how about mini ones with a salad and Sweet Chilli Dipping Sauce for a starter.

I have mine with wedges when my family are tucking into fish and chips!

Oh!  To cook, simply pop on a baking sheet or baking paper to avoid the need for oiling the tray and cook at 220 (200 for a fan oven), that's about Gas 7 for 15-20 mins.  Remember to take your frozen fishcakes out of the freezer to defrost (although I have been known to have forgotten this and cooked them from frozen and just lowered the temperature slightly and given it 35 mins minimum to ensure that it is cooked through!)

The fat content in these will change according to whether your fish is oily or not (watch out salmon), an egg is 6 grams of fat, I can usually get around 6-8 fishcakes dipped from 1 egg, then oil on your baking tray....or no fat content if you use baking paper.  Sunflower oil is 5 grams of fat per 5ml teaspoon.  You can keep a note of the fat content of your breadcrumbs as you fill your bag from your leftover bread that you blitz.

Looking forward to my next lot of Fish 'n' Chips!

See you soon,
Nora
xxxx


Sunday 8 March 2015

Pointe Shoe Tips - A Tutorial (of sorts)

Waaaaaaay back here in July 2013, I had a fantastic trip to London to buy my first ever Pointe Shoes...happy-skippy-smiley...or what!!

They were absolutely gorgeous and although I danced on them a couple of times, it was a matter of urgency to get some tips on....you can imagine satin on wooden floors!

Having scoured the internet, I couldn't find any I liked and sadly no tutorials either...so....I decided to go with the flow and make it up as I went along!  Most unlike me who needs a pattern for everything!

I decided to use embroidery floss, this one to be exact......


and a 2.5mm crochet hook.


In true 'ME'-style, I was so intent on getting the correct shape for my shoe that I forgot to write down the numbers of stitches...but apart from the chain and joining with a slip stitch, my only other stitch was a Treble (UK terms) for the main tip and Double (UK terms) for the flap to the sole....all will become clearer....! 


It looks like I've chained 7.  4 to work in and a chain of 3 to lift me from the chain to working the trebles.


It looks like I've worked my 3 ch and 3 more trebles into that forst stitch, then a treble in the next 2 stitches.


On this photo (above) I have definitely worked the 3ch and 3 tr into the 4th chain from the end, 1tr into the next 2 chains and in the chain next to the tail, 7tr, then 1tr in the other side of the middle 2 chains and 3tr onto the end joining my 3ch with a slip stitch.


I've then come up to the next layer or round by ch3, 1tr into each stitch EXCEPT on that very middle stitch at each end where (to keep it flat) it looks like I've worked 3tr.


This picture is quite clear so use that as a guide for shape and numbers of stitches.  I've finished that round by slip stitching into the top of my 3ch.

That is the main part of the tip covered and you may wish to stop there, however I now need to work a small 'flap' piece to go under the tip towards the sole of my shoe, like this.....


Here is where I made a single chain to lift me up to the next layer and it looks like I've them made 8 doubles.  Make as many as you need to keep your work flat and give you a nice gentle shape from the tip up onto the flap.  I then turned my work and worked doubles back along that row.  Like this....


I then sewed my tail back along through the doubles to secure it.


Then I used some PVA glue to stick the tip in place on my shoe and hand stitched it into place around the edge with my thread doubled.  Just sew until you feel it is secure.


Sorry about the quality of this picture, but as you can see the top of my shoe or upper, is not covered at all by the tip.  It also looks neat and I can say functions beautifully!  I feel very secure en pointe and I think it finished the shoe to perfection.

Every little girls dream...her most perfect pointe shoes.

I hope that helps someone, sorry there is no pattern as such, but if you do have a question, please leave a comment and I'll get back to you,

take care
Nora
xxx

Thursday 5 March 2015

Magnetic Pegs

I've been looking for some pretty but fairly large magnetic pegs for my fridge and freezer.

When we had the kitchen revamp I vowed to have NOTHING on them....but Little Lady was only 6 weeks old and as she's grown there are the inevitable works of art, achievements and events that have no home.  So what better to use to display them all but pretty pegs?

And after trawling the Internet and finding nothing that I liked at a price I wanted to pay, I've now got these.........


I found the pegs and some magnetic strips whilst browsing in my local The Works shop.

Here's the wrappers with the cost!.....


Not at all bad eh?

All I did was cut the strip to fit the full length of the peg and stuck it on!

So here is my newly organised fridge and freezer.........


...with space for Little Lady to use the bottom portions.

Happy Little Lady, happy Mummy & Daddy.

Catch up again soon, 
Nora
xxxx

Wednesday 4 March 2015

Make Me a Wardrobe 2015..........#mmaw2015

So you may remember back here, I made the very rash decision to join this challenge set by Jen over at My Make Do and Mend Year.

Jen completed her MMDaMY back in 2012/13 and has continued her blog with recycling, up-cycling, reusing, re-purposing and generally using up and putting to good use things that would otherwise go to landfill OR prevents landfill being used for packaging by reducing what she buys packaged AND being healthier by cooking from scratch (hope that's put it in a nutshell Jen!).

She most recently threw down the gauntlet for herself, to use up her stash of curated fabric and reduce the need to buy new by making herself clothes from said stash.

She very kindly (and probably for company if she's like me!) opened up the challenge to other disgraceful hoarders her faithful followers and named the challenge Make Me a Wardrobe 2015 or in true hash-tag fashion.... #mmaw2015.

In January I submitted a stash-busting reversible pinafore made for Little Lady and in February my Pyjama bottoms.

This month comes a make that isn't so much 'wardrobe', but it is something that I have been promising to make myself for literally 3 years!

I bought some fabric from the clearance stack at my local C & H Fabrics...about 3 years ago!  It was intended for a dress for Little Lady, but then she grew quicker than I could find a pattern I liked and then I wasn't sure if the fabric was really her anyway!

I've been coveting aprons on Pinterest for so long....I've now popped them on my Afternoon Tea board...why not!

And that is what bought me to this make...

This Saturday I am holding a Red Nose Fundraiser in the form of A Lazy Crafternoon Tea.  I'll be serving all the usual fare and helping friends out with craft makes for a donation to my cause.

Well, every self-respecting Afternoon Tea Hostess NEEDS a suitable apron for the job!  So armed with my fabric and a couple of spotty fat quarters for the trim and pockets I set to work on a reversible apron.

I took the basic pattern from here, changed the neck and used this pattern for the pocket.

So here's mine.......


Sorry about the non-smiley, concentrating face!


And here's the other side.....


The smile's better but the light's not!

I can also bring the ties to the front like this....


....and this also shows the pocket detail.

Here's a close up of the pocket on the other side......not perfect but not bad for a first attempt and just right to pop a tissue in!


Because I fiddled to get the pattern I wanted, it took longer than I thought, but I LOVE it!

That's my entry for Make Me a Wardrobe 2015 for March...now to think about April.....

Until the next time.
Nora
xxxx

Monday 2 March 2015

Some lovely spending!

Helloooo!

Yes, guilty AGAIN!

But, it's all (well nearly all) in a good cause, twice over!  It came from my local charity shop, Horsham Matters and is for me to fund-raise.

This coming Saturday I am holding a Crafternoon Tea for my lovely friends who like eating Scones, drinking Tea and Making!  We're going to be raising money for Red Nose Day in conjunction with Mollie Makes Magazine!

In order to put it on in my mad style, I have been searching the charity shops for some lovely bits and pieces and have been somewhat successful!

How about these....

to use as a little cover for the jam

to put the jam in!

for serving something delicious!

lovely little sugar 'shovels', one for jam, one for cream!

6 gorgeous little glasses, look at thee birds.....kingfisher


...tit....

..bullfinch?....

I also have a lovely tea set and 2 mismatched teapots.  I have bought sugar tongs from eBay and are currently searching out pastry or cake forks.....it's going well and (I hope) will all come together for Saturday afternoon!

You will also have noticed a pink gingham pillowcase....it's for another Little Dress for Africa...more about those another time.

I'll let you know how the Tea Party turns out!

Love
Nora
xxxx

Spring is springing!

My Mum had Little Lady overnight on Saturday so that The Hubs and I could go to the cinema to see The Second Best Exotic Marigold Hotel....great fun.

We collected her yesterday and were treated to one of my Mums delicious lunches.

After we had to really give ourselves a good talking to, to go and walk it off!

We took a circuit through the old farm and round to the children's playground and I just managed to grab a few pics of the glorious day and signs of spring...so here they are...........

A beautiful Camellia in my Mum's garden

Blue sky and countryside, bliss.
 
Time to play!

Catkins blowing in the wind.

Daffodils peeking through.

Has Spring sprung in your neck o' the woods?

Back soon with some cooking and some buying!

'Til then...see ya.
Nora
xxxx